Everywhere you look these days, people are looking for an opportunity to grow their own vegetables. In Minnesota, as a child, my Mom and Dad had a big veggie garden – and about 50% of the space held potatoes. It was always a big day when we dug up the potatoes in the fall – lots of digging, lots of work.
Today, even if you have a small yard or even an apartment patio, you can grow potatoes. This isn't an extremely new idea, but so, so many people do not know about it that I thought I would share it.
Begin with a bag of potato sets. You can purchase them online, at your local hardware or big box store, or you can use the small potatoes that you have saved from your garden last year. I hesitate to tell you to use the potatoes that you have in your pantry for eating because they are usually sprayed with some sort of a sprout “inhibitor” – so you may not get them to grow.

When you purchase your sets, they look just like small little potatoes – and that is exactly what they are…but you need to do a couple of things to them before you plant them.

1. Look at each of the little spuds. You will see “eyes” – or small sprouts that look like they could grow. Your potato will have numerous eyes – locate all of them. Once you have figured out where they all are, cut the potato in pieces making sure that each section of potato has an eye. You may have big pieces along side small pieces – it doesn't matter. If there is an eye in the piece, you have the possibility that it will grow.
2. Lay the sections on newspaper and allow them to dry for 2-4 days before planting. This is very important as the potato pieces need for harden and form a bit of a “skin” on the cut sides.

Next, check your soil temperature – we all get excited in the springtime to “get those crops in the ground” – but this is a very important step that should not be missed. Your potato sets need a 50 degree soil temperature at 8:00 am (with the temperature taken at 4″ deep) to germinate….meaning – if it is too cold, those little eyes are just going to sit there and rot!
Here is where the small growing space comes into play…..we live on a farm and have numerous old water troughs that have gotten a hole in them for one reason or another. But, if you have a small back yard or apartment building (and no old water troughs!) – then get yourself a large trash container. Drill some drainage holes in the trash can on both the bottom and on the sides towards the lower end. The reason for the side holes is that if you get a really huge rain, like I did once, the bottom holes clogged with debris and the potatoes were swimming in their container. I have put a few “safety” side holes in the cans ever since!
Put about 10-12″ of dirt in the bottom of container, and plant your potato sets 12″ apart 4-6″ deep.
Sit back and wait for the sets to send up a shoot.

Here's the fun part! As a child, I always remember my Dad “hilling” the potatoes. I never could figure out why??? The potato plant comes out of the ground and we hurry to cover it up? Hmmmm! It wasn't until years later that I came upon this diagram:
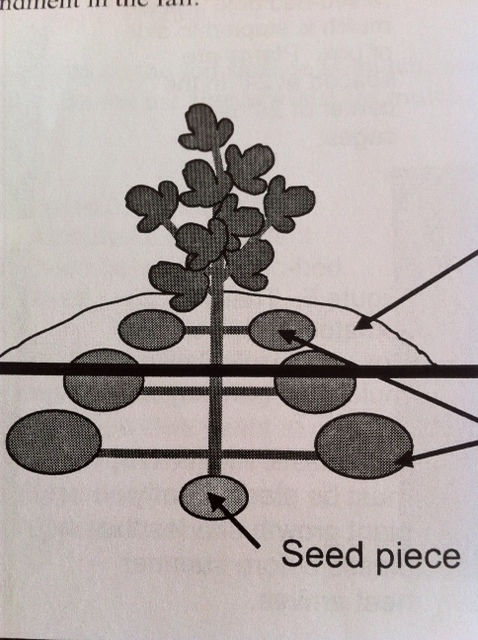
As you can see, the potato that you have planted is at the bottom of the picture. It sends up a shoot and all the new potatoes grow above the planted potato set! To shield the growing tubers from sunlight (which turns them green and makes them mildly poisonous), the soil is hilled around the base of the plant. (A thank you and credit to my Colorado State University Extension for this diagram).
We have found that if you mulch your potato plants with straw (instead of hilling them with dirt), you will find it easy to harvest your potatoes in the fall. Simply scoop the straw away and your harvest is right there in front of you. If you grow your potatoes in a trash can, you can simply turn the can on it's side to get at your bounty! Plan on about 125 days after germination before you will be able to enjoy the fruits of your labor!


