Archives

Making Your Own Cottonwood Bud Oil

IMG_0669


Spring time in the Rockies!   What a beautiful time of year!   The grass is beginning to grow, the baby calves are being born and it looks like summer is within sight!

IMG_0663

We recently watched a reality show where the people made their year’s supply of a wonderful salve that they claimed to use on everything from sore muscles to diaper rash.   Also known as balm of gilead, the salve contains a bounty of medicinal properties.   It’s made from cottonwood buds whose resin contains “salicin” – which is the same compound that gives aspirin it’s pain relieving, anti-inflammatory benefits.   Using the balm as an external rub will reduce joint pain (as with arthritis and rheumatism) and will ease sore muscles.

Because cottonwood is high in antioxidants, it is useful for healing the skin, including sunburn.   The buds are also antiseptic and can be added to other oils to prevent rancidity and molding.

Since we live on a creek bottom full of cottonwood trees, my interest was piqued.

The best time to harvest the buds is in late winter to early spring – so I grabbed a plastic bucket and headed for the woods.

IMG_0668

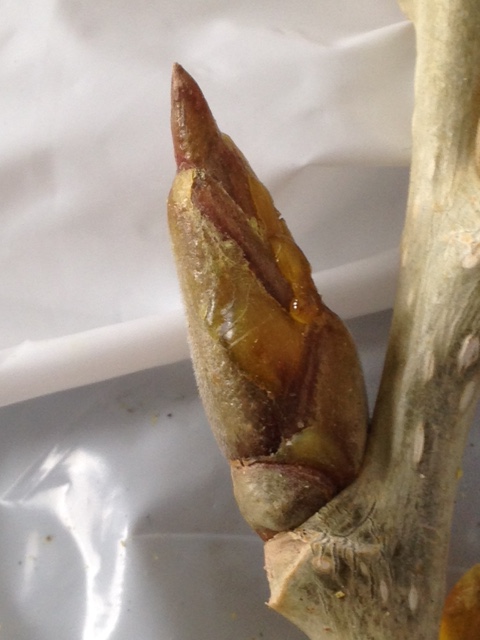
I picked these buds in early February – they were just beginning to swell.   You can see the little drop of resin.

IMG_0667

While most recipes called for placing the buds in olive oil, I did find one recipe that used rendered beef fat.   I have LOTS of that – beautiful grassfed beef fat – rendered and frozen in blocks.   It got my vote!

IMG_0665

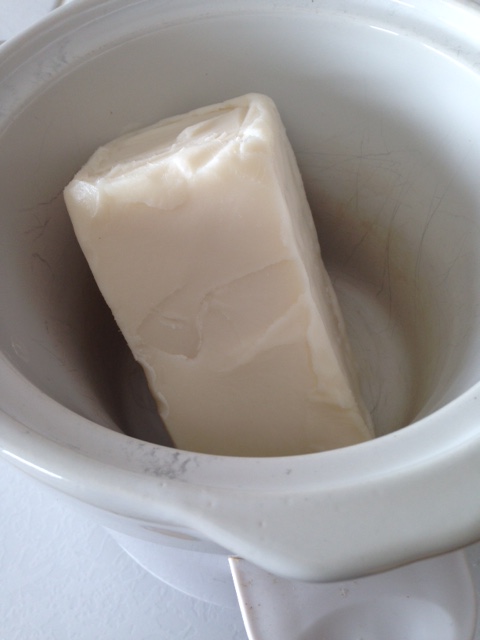
I placed the frozen fat in my crock pot and put the temperature on low to let it melt.   After removing the buds from the twigs I had gathered, they were chopped quickly in a blender.

IMG_0666

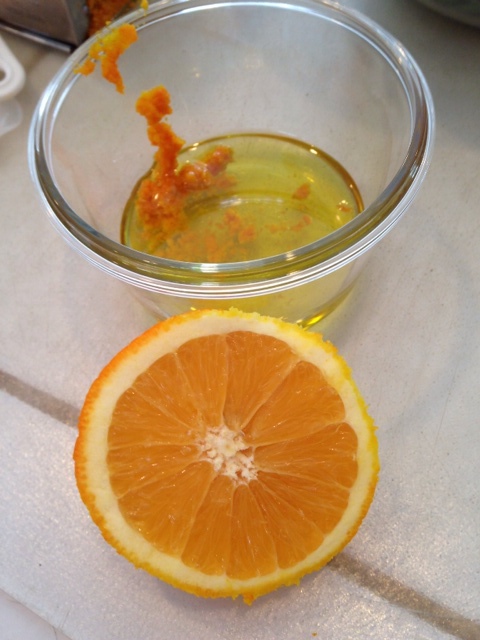
Then, I combined the melted beef fat with the chopped buds in the crock pot – and gently simmered for about 48 hours.   Upon waking on the second morning, our house had a wonderful, aromatic smell!   The resin from the buds had turned the rendered fat a slightly orange-ish hue.

I strained the mixture through cheesecloth, wringing to extract all of the oil.   At this point, the oil is done – but it is runny (like a baby oil consistency).   I wanted to use it more like a salve, so the oil was then warmed with a small amount of candellila wax to “thicken” it.   Use about 1 ounce of wax to 5 ounces of oil.

It was poured into jars and then cooled, sealing with a canning lid.   Store your salve in a cool, dark place.

IMG_0662

A note of caution – I have read that people who are allergic to aspirin may also be allergic to cottonwood bud oil.   Please check with your doctor before using if this is the case.

This lovely salve has been our “go to” for arthritis pain and sore muscle rubs.   It helped a friend who rubbed it on his elbow afflicted with tendonitis, and it calmed an injection site from a tetanus shot.   I think we will be gathering cottonwood buds for years to come!

Double your Garden Space with Double the Benefits!

Almost time to start digging in the dirt! The cool season crops, like spinach, lettuce, broccoli, cauliflower, kale, peas, etc., are happy to be already planted in our zone 5. They can take the cooler soil and air temperatures. Frankly, they will soon be unhappy when the warmer days are upon us.


My broccoli is growing nicely in the high tunnel. Since my temperatures can get quite high in there and these cool season crops will bolt, I've installed some old hog paneling over the raised beds to accommodate my heat-loving vining crops.


My intention here is to let my pumpkins, cucumbers, squash and melons grow up and over the cool season plants that are growing below. I've planted some vining crop seedlings that I had already started in small pots. As they grow, they will shade the stuff below – keeping them somewhat cooler – and have plenty of room to vine as they wish! I have read that the cucumbers are easy to pick as they will hang down below the openings in the hog panels. The pumpkins and melons will need a “sling” to support them – I'm sure some old pantyhose will do the trick! I'll let you know!


Power Your Day With A Kale Salad

Here is a recipe that just may change your opinion of a “kale” salad. It is packed full of color, flavor, fruits and veggies, is super-nutritious, and is just plain delicious!! The dressing is a simple mixture of fruit juice and olive oil. Give it a try!


Start with a bunch of freshly washed/dried kale – baby kale is ideal, however, I had good results from just removing the center rib section from my bigger leaves. To this, I added a good-sized handful of baby spinach leaves. Chop or tear all the leaves into small sections and place in a large salad bowl.

Next, toast one-half cup sliced almonds on top of the stove until slightly brown. Set aside to cool.

Dressing: In a separate small bowl, zest an orange. (Reserve the fruit for later). Add 1/4 cup of a good (organic) extra virgin olive oil to the bowl followed by 2 tablespoons of orange juice which you will squeeze from the orange you just zested. Add 1 1/2 tablespoons of lemon juice, a little salt and pepper and then stir.

Add 1/2 cup of cran-raisins and the toasted almonds to the kale/spinach mixture and top with the dressing that you've made. Toss to coat thoroughly and let stand at least one hour.

Just for fun, I also added some roasted sunflower seeds and raw hemp hearts. The hemp hearts have a nutty taste and add some all important Omega 3s to the dish!

Peel the rind from the remaining orange and chop fruit into small sections.

The dressing gives the salad a light, fruity flavor. Packed with goodness – hope you enjoy it as much as I do!


My Self Proclaimed Challenge – Homemade Everything!

It started a few years back – you know, you run out of some ingredient and you have to either find a substitute or go without. Where I live, the closest grocery store is a half-hour away. With fuel over $3.00 a gallon, I figure a trip has to be very necessary at that price – so homemade became my motto. About five years ago, I vowed to avoid processed food. Living on a farm with a great big garden made that really easy. I don't eat every meal good, but at least five out of seven is healthy, homegrown, and without preservatives.

I challenge myself each time I go to the grocery store to see what aisle I can avoid. Haven't seen anything in the freezer aisle for years….because it is all processed food. If I am hungry for waffles, I make my own from scratch. I know… I understand that I do not have to leave home for an 8 to 5 job anymore so I have time to live this way, but I also think I would still get up early to keep this style of living even if I had to be out the door to punch a clock.

In the next few posts, I thought I would share a few more reasons to avoid buying prepackaged items. Usually, you can make a batch of glass cleaner, non-abrasive cleaner or laundry detergent for pennies on the dollar AND make a large batch while you're at it. You spend the time to make a big batch of laundry detergent and you are set for months.

So here's a few ideas for your own homemade fabric softener – perhaps one of them will fit your lifestyle!

First option: crumple a few balls of aluminum foil and place in the dryer with a load of clothes. As crazy as that sounds, the metal dissipates the charges that build up between the fabric as it flops around in the dryer.

Second option: plain old vinegar to the final rinse water. It will not only take the leftover soap out of your clothes, but also helps to clean washers and drain hoses too! You do not the risk of smelling like a pickle from using vinegar – when your clothes are dry, the smell has dissipated. If you insist, you can add 10-20 drops of an essential oil (eucalyptus or lavender for example) to the vinegar.

Third option and my favorite to date: Take 2 cups of a cheap hair conditioner and combine it with 6 cups of hot water. When it is all mixed together, add 3 cups of plain white vinegar. No chemicals, no artificial flavors or colors. This makes a family sized batch – pennies on the dollar,

So – here are a few ideas for you to start you off! Many more to follow. If you have a great homemade, no preservative, no processed, no artificial anything you'd like to share – let me know!

Til next time…


A Great Recipe for Your Cherry Tomatoes

It's October, and our area has already experienced a number of frosty nights. We hurriedly pulled the tomatoes from their vines and have frozen and canned a number of batches. One favorite recipe for our cherry tomatoes follows. It makes a beautiful presentation and is full of all kinds of nummy flavors!


Cherry Tomatoes Stuffed with Mozzarella and Basil

This recipe will yield about 36 hors d'oeuvres.

1/2 pound of fresh mozzarella, cut into very tiny diced pieces. Should cut enough to make approximately

1 1/4 cup

3 tablespoons of extra virgin olive oil

1/3 cup of chopped basil leaves

1/2 teaspoon of freshly grated lemon zest

Salt and pepper

20 cherry tomatoes


In a medium bowl, stir together the cheese, oil, basil, lemon zest, 1/2 teaspoon of salt and 1/4 teaspoon of pepper. Place in the refrigerator for a couple of hours before assembling to let the flavors all come together.

Slice each cherry tomato in half and scoop out the insides with a melon-baller or teaspoon. Sprinkle each half with a dash of salt and place, inverted, on a paper towel to drain for about 15 minutes.

Fill each tomato half with about a teaspoon of the cheese mixture and arrange on a serving tray. We like to finish the plate with a drizzle of balsamic reduction over the tomatoes – not much – just a little bit for a great flavor!

Enjoy!


A Special Dinner – Honey Baked Chicken

Everyone has a favorite dinner – one that they choose when it is a birthday or other special occasion. One of my favorite meals has always been chicken and dumplings….my mom could make the best dumplings. Light and fluffy – and when I would visit, she would inevitably make the special meal for me.


In our house, one of our favorites is a recipe of Honey Baked Chicken. Since the chicken bakes in a mixture of butter and honey along with some great spices and mustard, it is not a low-calorie meal. We simply choose to make it a few times a year – to celebrate a special day or get-together!

We start by peeling and slicing a few potatoes and placing them and four deboned, skinned chicken breasts into a baking pan.


Combine 1/4 cup of melted butter, 1/2 cup of honey, 1/8 cup of prepared mustard, 1/2 teaspoon of salt and 1/2 teaspoon of curry powder.


Pour this mixture over the chicken and potatoes and bake at 350 degrees for 50 minutes. Baste every 15 minutes or so which will keep the meat and potatoes tender and browned nicely.

Mmmmmm! Enjoy!


Save Money (and a Long Drive to Town!) with Homemade Cleaning Product

Where we live, it's a long trip to the grocery store – when we run out of something, it simply goes on a list. When the list is long enough or the need outweighs the waiting – you go buy the stuff on the “list”. So, partly because of this and partly because I am a do-it-yourself'er, I am always on the alert for simple ways to skip a few aisles at the grocery store. I had so many comments on the window washing solution in my last post, I thought I would share a few of the other cleaning products that I make and use. Be on the watch for future posts – there are a lot that I will post at a later date.


Ever used the product that you drop into your garbage disposal to clean it up and make it smell better? I have – it works great. One type makes this blue foam that swells up into the sink – when it disappears down the drain, your disposal is clean. But if you have a lemon, some white vinegar and an ice cube tray, you can make your own cleaner for mere pennies. Simply slice the lemon into small pieces (including the rind), and drop them into an ice cube tray. Fill with vinegar and freeze. When your disposal needs a cleaning, use a couple cubes with the water running.


Counter cleaner is another favorite. This homemade product smells great, costs very little and kills germs! We use one gallon of distilled water, 2 teaspoons of washing soda (this is not baking soda – look for washing soda!) 1 teaspoon liquid soap, and 1/4 teaspoon of essential oil. For years I have used a combination of tea tree oil, lavender oil, thyme oil and lemon oil. The antibacterial qualities of these essential oils will help keep your counters clean and germ free. You end up with a gallon of wonderful spray cleaner that will last a long time!

This laundry soap recipe has been shared by many – but just in case you missed it – this one works great! There are two ways to make the detergent – and I prefer the “dry” version because of the amount of storage space the “wet” version requires. Figured I didn't need to store “water”! I simply combine one and a half cups of washing soda with a half cup of borax. Then add one bar of either Fels Naptha soap (grated) or one bar of Ivory to the washing soda/borax mixture. Use 1 tablespoon for regular loads and 2 tablespoons for heavy loads. Note: I soak the majority of my grease-laden clothes for 8 hours or so and also add a couple of teaspoons of lemon or orange essential oils to help cut the grease. Depending on how fine you grate the soap, this extra soaking time also allows the soap to melt.

Besides saving you money at the grocery store, these products keep you away from harmful toxins that are in many household products. Consider this – essential oils are an economical way to disinfect, clean, and deodorize. Thyme oil kills strep and staff on surfaces, lavender and rosemary are antibacterial, anti-infectious and anti-viral. Lemon oil kills strep and staff in the air and is great for cutting grease. Use equal parts eucalyptus, tea tree and lavender oils for air fresheners. Simple products, natural products. Simple!


Save Money (and a Long Drive to Town) With Home Made Cleaning Products

Where we live, it's a long trip to the grocery store – when we run out of something, it simply goes on a list. When the list is long enough or the need outweighs the waiting – you go buy the stuff on the “list”. So, partly because of this and partly because I am a do-it-yourself'er, I am always on the alert for simple ways to skip a few aisles at the grocery store. I had so many comments on the window washing solution in my last post, I thought I would share a few of the other cleaning products that I make and use. Be on the watch for future posts – there are a lot that I will post at a later date.


Ever used the product that you drop into your garbage disposal to clean it up and make it smell better? I have – it works great. One type makes this blue foam that swells up into the sink – when it disappears down the drain, your disposal is clean. But if you have a lemon, some white vinegar and an ice cube tray, you can make your own cleaner for mere pennies. Simply slice the lemon into small pieces (including the rind), and drop them into an ice cube tray. Fill with vinegar and freeze. When your disposal needs a cleaning, use a couple cubes with the water running.


Counter cleaner is another favorite. This homemade product smells great, costs very little and kills germs! We use one gallon of distilled water, 2 teaspoons of washing soda (this is not baking soda – look for washing soda!) 1 teaspoon liquid soap, and 1/4 teaspoon of essential oil. For years I have used a combination of tea tree oil, lavender oil, thyme oil and lemon oil. The antibacterial qualities of these essential oils will help keep your counters clean and germ free. You end up with a gallon of wonderful spray cleaner that will last a long time!

This laundry soap recipe has been shared by many – but just in case you missed it – this one works great! There are two ways to make the detergent – and I prefer the “dry” version because of the amount of storage space the “wet” version requires. Figured I didn't need to store “water”! I simply combine one and a half cups of washing soda with a half cup of borax. Then add one bar of either Fels Naptha soap (grated) or one bar of Ivory to the washing soda/borax mixture. Use 1 tablespoon for regular loads and 2 tablespoons for heavy loads. Note: I soak the majority of my grease-laden clothes for 8 hours or so and also add a couple of teaspoons of lemon or orange essential oils to help cut the grease. Depending on how fine you grate the soap, this extra soaking time also allows the soap to melt.

Besides saving you money at the grocery store, these products keep you away from harmful toxins that are in many household products. Consider this – essential oils are an economical way to disinfect, clean, and deodorize. Thyme oil kills strep and staff on surfaces, lavender and rosemary are anti-bacterial, anti-infectious and anti-viral. Lemon oil kills strep and staff in the air and is great for cutting grease. Use equal parts eucalyptus, tea tree and lavender oils for air fresheners. Simple products, natural products. Simple!


Easy Window Washing!

No matter how many times I have tried in all of my years, I have never gotten any good at washing windows. I have heard the different arguments, use newspapers to dry the windows instead of paper towels. Never wash on a sunny day. The list goes on and on. So when I read an article saying your could make your own solution to clean your outside windows and then never have to dry them……well, it sounded too good to be true! I had to try it!

I mixed up a half of a bottle of “jet dry” (the product you use in your dishwasher to keep your dishes from spotting), 4 tablespoons of rubbing alcohol, one handful of automatic dishwasher powder, 1/4 cup of ammonia, and 2 gallons of hot water. Using a cloth, wash the windows with this solution. Have your garden hose ready, when you are done, you simply spray the soapy water off the window. That's it! No drying (or in my case, streaking…) just go on to the next window. I had the whole house done in minutes instead of hours. I will recommend that if your bucket of washing solution begins to get low or gets dirty, refill it with fresh solution. The last few windows that I washed, dried with a few water spots – and I am guessing it was because the anti-spotting solution in the bucket was almost gone.

I will tackle the inside of the windows today using a spray bottle filled with 3 tablespoons of ammonia, 1 tablespoon of vinegar and cool water. Works as well as the “blue” kind for only pennies!


The Best Weeding Tools

There's surely no doubt that the market is flooded with weeding products. One trip down the aisle of any hardware store will score dozens of products to apply. Here at our house, we try to avoid the “quick fix” of the chemical and rather go by some simpler approaches.


Our farmstead came with lots of implements when we bought it. The smaller ones were hanging on this old shed – seriously, all these things were hanging here on the day we came here.


The building appeared to be a blacksmithing/tool shed, and evidently – it was easier to find “just the right part” from the walls than rummaging through a bunch of shelves. There was a forge and a can of coal, there were old leather belts fashioned into tool holders. Old sardine cans hung as trays. Traps, pitchforks, and sand points for a water well. More than not, I had no idea what a lot of the things were – but there are a few that have become my favorites in the garden!


This old hoe looks ancient and I don't know that you would readily find another like it. (Believe me, if you do see a hoe for sale like this – buy it!) It has a slightly angled blade at the bottom of it that you can slide under a weed and slice it right off! Normally in my garden, a whole slurry of baby weeds seem to pop up, all at once, a week or so after putting in the corn, for example . This hoe is fantastic for slicing the top off the invaders without having to work up the soil again and I am able to work a section of the garden plot quickly and efficiently. You can also turn it on end and open a new row to plant your seeds in. Because it is not the typical “V” shape, the trench doesn't get too deep for many of the smaller variety of seeds in your garden.


I found this next gem at an auction last week. So much of my gardening is in a raised bed where soil compaction is at a minimum. By designing your raised beds to be narrow enough to reach 1/2 way across them, you will never find yourself standing inside the bed reaching for that carrot! Soil prep is a snap with this hoe!


So before you reach for a bottle of weed killer, take a look around for some simple tools that will protect our environment, your health, and your children's health. Not only are the best weeding tools in your hands, they are your hands!